Proxies Configuration for Shells & Terminal
Author:Anda Toshiki
Published:2023-11-02
Updated:2 months ago
Words:2.8k
Reading:17 min
TL;DR
This article discusses the configuration of proxies for shells and terminals. It explains the advantages of using proxy servers to bypass network restrictions and surveillance. The article provides examples of the challenges faced when accessing foreign services and shows how to set up a proxy tunnel using the curl command. It also provides scripts and instructions for setting up proxy switches in different shell environments, such as zsh, bash, and Windows CMD and PowerShell. The article concludes with additional information on proxy configurations for applications like ssh and tips for working with authentication procedures.
1. Background
Proxies or namely proxy servers are by far one of the most affordable or cost-effective option to establish a masked layer connection to bypass the network restrictions with the annoying surveillance tracked by a local network ISP as compared to a click-to-use VPN service, which generically requires more individual invest to protect themselves under the insecure internet environment nowadays. When a user resides within the environment where the local gateways of full, user-dominant open access towards the internet is censored or restricted with domestic network blockages by the country.

2. The Major Issue
The majority of the issue still heavily preserves across the developmental fields which the layer of the blockage imposes limits on communicating with third-party, remote platforms such as Github or registries like NPM for frontend developments that stores key packages or components, as a requirement during a pre-built phase of a project. Most of the time foreign services becomes completely inaccessible or fortunately users could reach the services during a possible ISP maintenance downtime but normally the potentiality is mere, or hardly none yet the load speed before TTL connection expires are objectively slow, shortly before the origin site DNS being spoofed again. The unpleasant experiences with the networking somewhat affects interest on development reduces by high percentages or it even strand some awesome projects ran ashore ultimately.
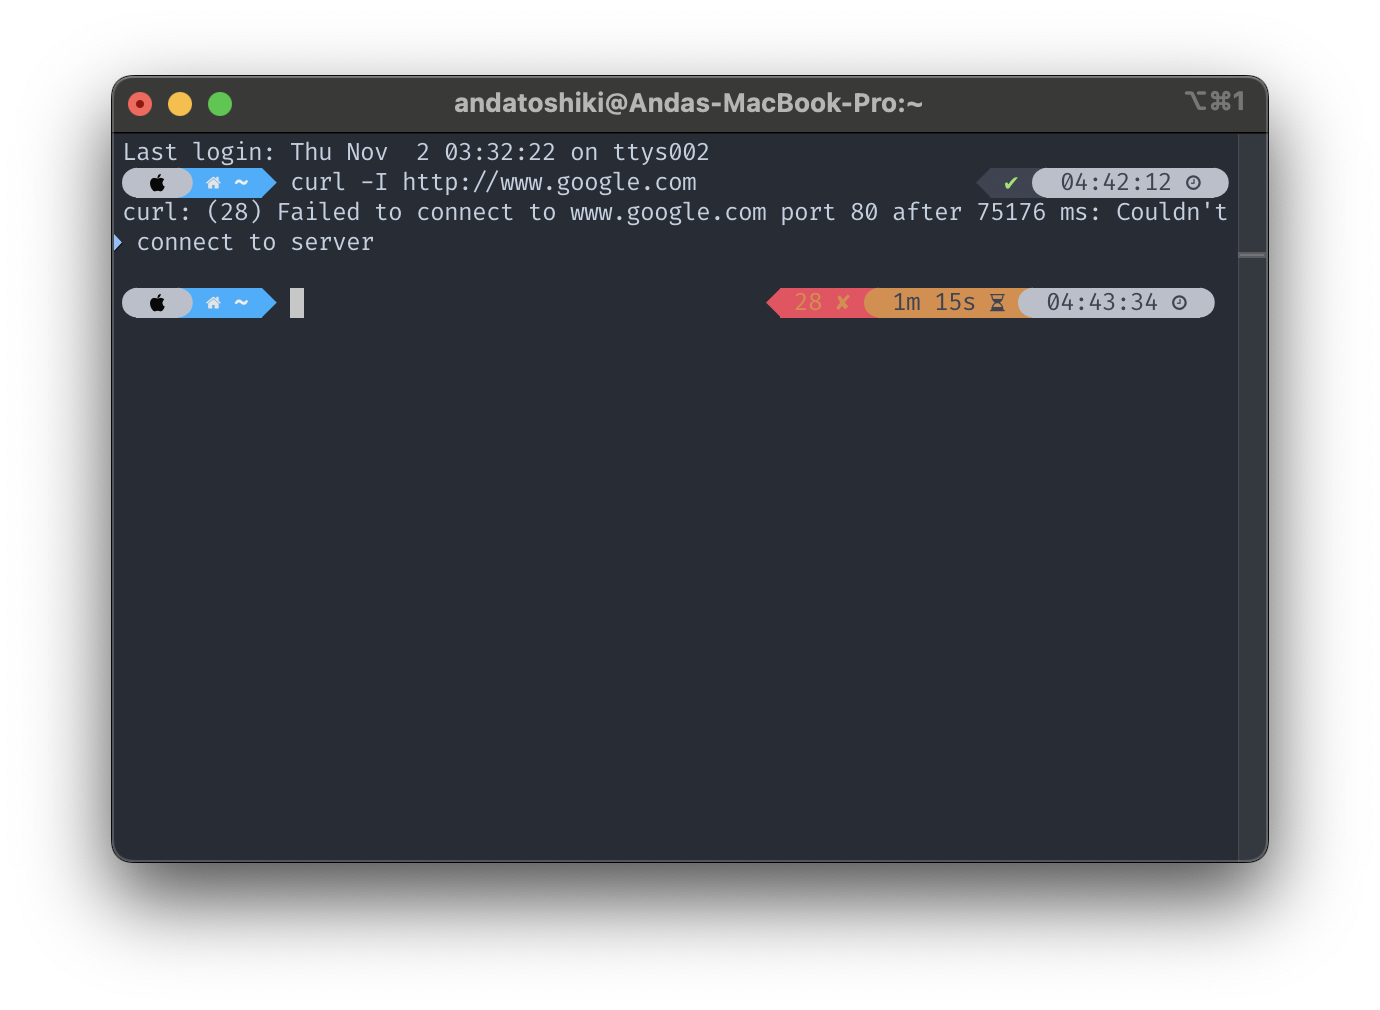
The following screenshots are a more direct representation to visualize the differences between the connection towards one of the most beloved search engine, Google with the following command via curl.
sh
curl -I google.comcurl -I google.comThe command is used to fetch the headers of a URL or web page. When you run "curl -I" followed by a URL, the command sends an HTTP HEAD request to the specified URL and retrieves the HTTP headers of the response. This allows you to view the information contained in the response headers without requesting and downloading the entire content of the page. The headers typically include details like the server information, content type, content length, status codes, and more.
The following screenshot from terminal indicates the the final output of the package availability received without losses on a bare unmasked network environment, which returns FAIL in the final connection after a dry run fails 11s after when the TTL expires the connection fails.
The next screenshot from terminal indicates a temporary proxy tunnel is established both in http and https protocol tunneled through a local proxy gateway at the local systemic IP address at 127.0.0.1 and exposes the proxy server at a mix of socks/https/http protocol port at 7890, just simply with the traditional export method by setting up in the nonce, the command is given as followed.
sh
export http_proxy=http://127.0.0.1:7890
export https_proxy=$http_proxy
export http_proxy=http://127.0.0.1:7890
export https_proxy=$http_proxyAnd then we re-enter the same command with curl from above; surprisingly, the header responses returned TTP/1.1 200 OK, thus the conclusion drawn here is the proxy server we launched was successfully up and running with tunneled access towards foreign sites without restrictions! Hooray!

Since each proxy configuration might varies atop of the user preferred client, not including ShadowRocket, Clash, V2ray or other proprietary softwares that are licensed either behind a paywall to run with; or simply expensive to purchase a subscription; the proxy ports forwarded varies alongside the changes amongst clients. But the overall approach taken into the account still remains the same with the following traditional formats, the local IP of the machine (normally 127.0.0.1) followed after with the specified ports. In the scenario of the article is referenced as example, I chose Clash (in spite the entire Clash project repository as well as its affiliated forked projects are being taken down by anonymous reasons by either archiving the overall projects or simply shutting down due to possible legal actions or political reasons regarding the country of residency of various developers).
sh
# http protocal
http://127.0.0.1:7890
# https protocal
https://127.0.0.1:7890
# http protocal
http://127.0.0.1:7890
# https protocal
https://127.0.0.1:78902.1: Kill the Complexities; Unleash the Simplicity!
But, the logic routes to the central question on: How can we simplify the course of action on setting up proxies without manually run export command every single time we wish to use? Below is a simple approach by aliasing a shortcut code to a proxy switch script amended towards your shell configuration profile that initializes on every session startups, in this case I uses zsh since it's integrated as the default shell on macOS since the release of macOS Catalina, yet it's one of my most familiar and favored shell when was using other OS as well.
Though some people might use autosuggestion extensions as third-party shell features to automatically predict the command completion after a code piece is inputted such as zsh-autosuggestion plugin or fan of fish shell users has the native privilege of auto completions but I personally not fond of such featured integration since it might decelerate the load speed of an active session; I prefer stick tightly with original shell.
sh
# open your shell profile with an preferred editor
$ vim ~/.zshrc

# session proxy switch shortcut
function proxy_on() {
    export http_proxy=http://127.0.0.1:7890
    export https_proxy=\$http_proxy
    echo -e "global proxy for the current terminal session has turned on"
}

function proxy_off(){
    unset http_proxy https_proxy
    echo -e "global proxy for the current terminal session has turned off"
}

# restart your terminal with a new session or reload the config
$ source ~/.zshrc
# open your shell profile with an preferred editor
$ vim ~/.zshrc
# session proxy switch shortcut
function proxy_on() {
export http_proxy=http://127.0.0.1:7890
export https_proxy=\$http_proxy
echo -e "global proxy for the current terminal session has turned on"
}
function proxy_off(){
unset http_proxy https_proxy
echo -e "global proxy for the current terminal session has turned off"
}
# restart your terminal with a new session or reload the config
$ source ~/.zshrcThe proxy essentially provides two shortcut command function defined with proxy_on and proxy_off. he proxy_on function sets the environment variables http_proxy and https_proxy to http://127.0.0.1:7890, which is the default proxy port of the traditional clash protocol, here is where you could replace the IP with other remote proxy servers or ports of other local proxies .Enabling a global proxy for the current terminal session. Meanwhile the proxy_off function unsets (removes) the http_proxy and https_proxy environment variables, effectively turning off the global proxy for the current terminal session. When any of the both executed, the indicator message will be echoed on the terminal, see the following screenshot in action.

After you reload your shell profile you can test out the scripted command yourself. To test whether the proxy has a successful setup after the proxy has been switched on, run echo $http_proxy or https_proxy with a dollar sign in front of the alias as an indicator for environmental variable, the third command as shown in the screenshot above, the command will simply print the configured variable value addressed to the specified alias. Contrarily, if your terminal returns the following resultant,
sh
$ proxy_on
zsh: command not found: proxy_on
$ proxy_on
zsh: command not found: proxy_onThen you will have to distinguish the exact shell you are currently on, the hereinafter content are mainly targeted towards novice learners whom are unable to track the shell types or configuration on particular operating systems. The configuration file for each shell varies their file names as well the location of storage; while Mac users could directly apply changes based on the instruction provided above if your system if Catalina or above. To know what exactly the active shell running, run,
sh
$ echo $SHELL$ echo $SHELLThe returned string text will be the name of the current active shell, the following is a list of the possible shell profile config name affiliated with each shell; most of the config profile files should be lied under the ~ or the root/home folder of each operating system with a dot in front of the file names are inferred as hidden file or directory in most of the Unix-like systems, such as macOS, Ubuntu, Debian and etc, but some of the config file such as fish shell could locate in an isolated config directory. The usual format of a config file is as followed,
shell
~/.zshrc~/.zshrcThe following is a list of the most common shells with their possible profile file names that corresponded,
/bin/bash:.bash_profileor.bashrc/bin/zsh:.zprofileor.zshrc/bin/fish:~/.config/fish/config
Still, the location might still varies, users might have to perform individual research to precisely locate their configuration file location, which is out of my jurisdiction of concerns (it's just evident action of procrastination and laziness, my apologies if none of the ones above fits your demand) ;).

For Unix-like users, after you have specified your shell as well as your config file name and locations, copy the following code chunk as command and paste it back into your terminal and run to apply permanent changes to the configuration.
sh
cat >> ~/.zshrc << EOF
# session proxy switch shortcut
function proxy_on() {
    export http_proxy=http://127.0.0.1:7890
    export https_proxy=\$http_proxy
    echo -e "global proxy for the current terminal session has turned on"
}

function proxy_off(){
    unset http_proxy https_proxy
    echo -e "global proxy for the current terminal session has turned off"
}
EOF
cat >> ~/.zshrc << EOF
# session proxy switch shortcut
function proxy_on() {
export http_proxy=http://127.0.0.1:7890
export https_proxy=\$http_proxy
echo -e "global proxy for the current terminal session has turned on"
}
function proxy_off(){
unset http_proxy https_proxy
echo -e "global proxy for the current terminal session has turned off"
}
EOFThe script above will write-in and install the proxy switch script and save the the content to the very end of the file. As a kindly reminder, if your shell is not zsh make sure to replace the string after cat >> to the actual path of your profile as well as your proxy server IP and port to the actual functioning details to your own demand; then ultimately, don't for get to reinitialize the shell by close and reopen the terminal or simply sourcing the config,
sh
source ~/.zshrcsource ~/.zshrcTo check whether the proxy script has taken its effect to the current session, don't forget to rerun the same echo command indicated as above. And up until here, the script has been properly installed and operatable as a charm, if your's still does not take any effect, go through the process again and read carefully through the documentation.
3: To All Windows Users
The documentation above are mainly targeted towards macOS & Linux users, to setup local proxy with Windows machines there is a complete different approach if you are more comfortably working with Powershells and CMD, since I disused windows less and less frequently by the time I decided to upgrade my device to macOS; even if I did use Windows my primary choice of developmental environment is still Linux by the native support of WSL with enhanced Ubuntu version in a virtual environment; the following commands are only done from my prior researches, I do not fully guarantee the usability of the commands, please use them at your own risks if any unexpected errors not only including system crashes or other affiliated damages, I do not relate responsibility to any of those presented.

Simple concluding, abandon proprietary software, fall in the hug of open source; Linux even if most of the users might feel overwhelming when getting started with the system first :). Alright, enough with off-topic talkings, let's jump right in the process.
3.1: CMD
cmd
set http_proxy=http://127.0.0.1:7890
set https_proxy=http://127.0.0.1:7890
set http_proxy=http://127.0.0.1:7890
set https_proxy=http://127.0.0.1:7890The commands are basically the same to Unix but the major difference is the amend commands in Windows are set instead of export. Once again I haven't personally tested the command, thus only use them as a reference. And whenever you wish to unset the global proxy for the session just simply run the set proxy command again but without any proxy server details.
cmd
set http_proxy=
set https_proxy=
set http_proxy=
set https_proxy=3.2: PowerShell
Alike CMD, the string after are exactly the same but the setup prefix command differentiates,
powershell
$env:http_proxy="http://127.0.0.1:1080"
$env:https_proxy="http://127.0.0.1:1080"$env:http_proxy="http://127.0.0.1:1080"
$env:https_proxy="http://127.0.0.1:1080"And to revert to the default proxy setting, execute the following command to unset both the http and https proxy.
powershell
$env:http_proxy=""
$env:https_proxy=""$env:http_proxy=""
$env:https_proxy=""4: Extended Trivia on Proxy
Sometimes a proxy server may require an authentication procedure involving passcode for accessing before establishing a secure connection to interact with the server itself. From the partial article above we only discussed on a simple local proxy server setup including a host IP with its forwarded port gateways; but when facing the scenario described for a net connection, we will need a bit more complex method when working in the CLI environment.
Before we start, quoting from one of the answer from AskUbuntu, resolving the misconception on the difference between terminal application and the net utilities falls underly,
Terminal is not net application. Maybe is better to say, in your case, terminal is container for net application like
ssh,telnet,lftp,wget,lynx...
A terminal provides a command-line interface that allows users to send commands and receive responses from network applications, facilitating communication and control over a network connection. It acts as a mediator between the user and the network applications, enabling the user to send instructions and receive information, but not a proxy client.

Done with the technical talkings, now let's dive into the actual configuration process of the shell. Other than simply inputting a host IP and a port followed, the following formats are the default configuration for a proxy server with HTTP connection protocol, follow the exact same process as described based on your shell type, modify the fields with the following,
shell
export http_proxy=http://username:password@proxyhost:port/
export ftp_proxy=http://username:password@proxyhost:port/
export telnet_proxy=http://username:password@proxyhost:port/
export http_proxy=http://username:password@proxyhost:port/
export ftp_proxy=http://username:password@proxyhost:port/
export telnet_proxy=http://username:password@proxyhost:port/Another approach suggested by the same user whom provided the answer on AskUbuntu for all Ubuntu users, edit the proxy configuration at the root of your machine as follows,
sh
sudo -H vim /etc/profile.d/proxy.shsudo -H vim /etc/profile.d/proxy.shAnd add the exported proxy members aligning the format as above, then save and reinitialize the environment, viola. The patches edited are mainly targeted for incorporating with wget, ftp, lftp, telnet in terminal.
When working with ssh instance over a proxy, a different approach has to be taken since SSH library does not natively support SOCKS5 client, user will have to pass a ProxyCommand option as a workaround to apply proxied connection, below is an instance of socat,
sh
ssh -o ProxyCommand='socat - SOCKS4A:myproxy:%h:%p,socksuser=nobody' user@hostssh -o ProxyCommand='socat - SOCKS4A:myproxy:%h:%p,socksuser=nobody' user@hostThe proxyCommand option allows user to integrate socat as an intermediary mediator to establish connection above a proxy. Other alternatives like tsocks are as well viable to transparently use SOCKS for TCP traffic, Exemplifying running SOCKS5 over socat2,
bash
ssh -o ProxyCommand='socat - "SOCKS5:%h:%p|tcp:myproxy:1080"' user@hostssh -o ProxyCommand='socat - "SOCKS5:%h:%p|tcp:myproxy:1080"' user@hostFurther, socat2 for HTTP Proxy CONNECT method,
bash
ssh -o ProxyCommand='socat - "PROXY:%h:%p|tcp:myproxy:80"' user@hostssh -o ProxyCommand='socat - "PROXY:%h:%p|tcp:myproxy:80"' user@host